The crafting movement is going strong. When I googled “craft sites” there were 144 million results. I have a lot of experience with sewing but I was looking for fun things that I could make and share. I chose to make silly putty, water-colored mug, and a lotion bar. I chose these crafts because I thought that Lick students could use them in their lives, and Pinterest said they were quick and easy.
Before I even thought about crafting, I consulted the crafting queen Taft Kilpack ‘16 to seek her wisdom. I thought it would be best to ask someone who sells her own crafts through her shop Making- Tembo. Her tips for new crafters: “save your work! Even if you don’t immediately love it, it’s always interesting to look back on it later.” She also suggested I keep notes about what I did in each project.
A playable blob that is malleable and has no real use other than entertainment is an easy craft for Lick kids if they want a fidget toy in class or want something to get their mind off homework. I found this recipe on the social media crafting site, Pinterest.
Courtesy of Crafty Mom Blog Ingredients: 4 oz. of glitter glue, or regular glue with added glitter. 1 tsp of Borax (Frustrating and difficult to find, I had to purchase mine through Amazon.) 4 oz. of water
Total craft time: 10 minutes of total crafting time, 5 minutes of cleaning up the goo from the bowl
Amount of guesswork: High-Medium
End Result: ◆
I don’t know if there is an exact correlation between a high estimation rate and the low quality end product, but this craft would be an example of it. In terms of my process I would just suggest not to use the household product Borax. Not only was it hard to find, but it also didn’t add any stretchy quality. Although the texture of the “goo” was cool it was not the same as the childhood egg shaped classic silly putty, that is still available for purchase. There are replacement recipes that use corn starch and other supplements. Those have a clay like texture but are not as crumbly as my gooey creation.
Watercolored Mug:
Credits to Audra Kurtz Ingredients: 1 white ceramic mug Plastic bin deep enough to submerge the entire mug
Craft Time: 25 mins( not including the day the mug has to dry), 15 minutes of cleanup
Amount of guesswork: Low Medium
End Result:◆ ◆ ◆
I chose this craft because there is an ever-growing need for a unique mug at Lick that you can spot easily when you lose it. This craft has only one step and the materials were very easy to find. I ordered a plain white mug from Amazon. Plain white mugs can easily be found at Walgreens or on Amazon, where I purchased mine. For this craft, I watched the video from the vlogger Audra Kurtz, who posted an image recipe on Pinterest as well. Kurtz expertly swirled the nail polish in the plastic tub and flawlessly executed the dunk. Kurtz’s final product had a marble like finish, while mine looked like a tried to remove a nail polish design. I redunked it to spread out the nail polish and I started to like the final product more.
KK Tips: The nail polish creates a film on the top if the plastic tub so it’s important that when the nail polish is swirled it is done quickly. Kurtz mentions this in her video but I just want to emphasize this tip again.
Also, nail polish that is more water based spreads out better. I would recommend not using high polish finish because it has fast drying properties. While that’s great for your nails it is not so great for the mug. Finally, do this in your sink and use a plastic tub that you will not want to use again. If you get nail polish in your sink use your handy dandy borax to scrub it and the polish will come right off.
Lotion Bars:

Photo by KK Narita
Credit A delightful Home Blog Ingredients: 3 oz raw beeswax (I purchased mine on Amazon) 3 oz Coconut oil 3 oz of Cocoa butter Muffin tin
Craft Time: 45 mins (including the 30 minutes lotion bars must be in the freezer) cleanup time: 20 Minutes
Amount of guess work: Low, however I improvised.
End Result ◆ ◆ ◆ ◆ ◆
This craft was the one I saved to try last. I was slightly intimidated by the stove involved. There were three simple steps. Melt all the ingredients together, pour into oiled muffin tray, then finally enjoy in the shower before your body wash. This recipe called for lavender essential oil; my cabinet was bare of any lavender, but was fully stocked with great smelling teas. So when all my ingredients were melted I threw in my favorite earl grey tea. My favorite thing about this recipe was you can add a little something different each time you make it; I want to experiment with things like coffee, lavender flowers and other natural products.

Photo by KK Narita
My three crafts have taught me a lot. For one, I would rather experiment and scour for lotion bar recipes on Pinterest than do homework. Crafting can be a procrastinator’s dream. Once you start crafting it’s hard to stop, I still pin different lotion and soap recipes; my curiosity is getting to be overwhelming. My best crafting lesson is that perfection just doesn’t belong in some areas of your life; the best things may come from mistakes and crafting.
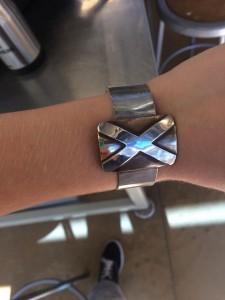
These are examples of crafts that other Lick-Wilmerding High School students made, inside and outside of class. From top: A canvas drawstring bag made by KK Narita ‘16. She made the bag in four steps. Moderate sewing skills are required. A wooden bowl made by the president of wood club, Kevin Hou ‘16. This is a layered bowl that has a plywood accent. A bracelet made by Averie Kellenberger ‘16, a current Jewelry student. This is an example of soldering and using different types of metal.


